 欧元、澳元、英镑、日元、印度卢比


全部的: $0.00
结账时计算税费和运费
 SGD
SGD


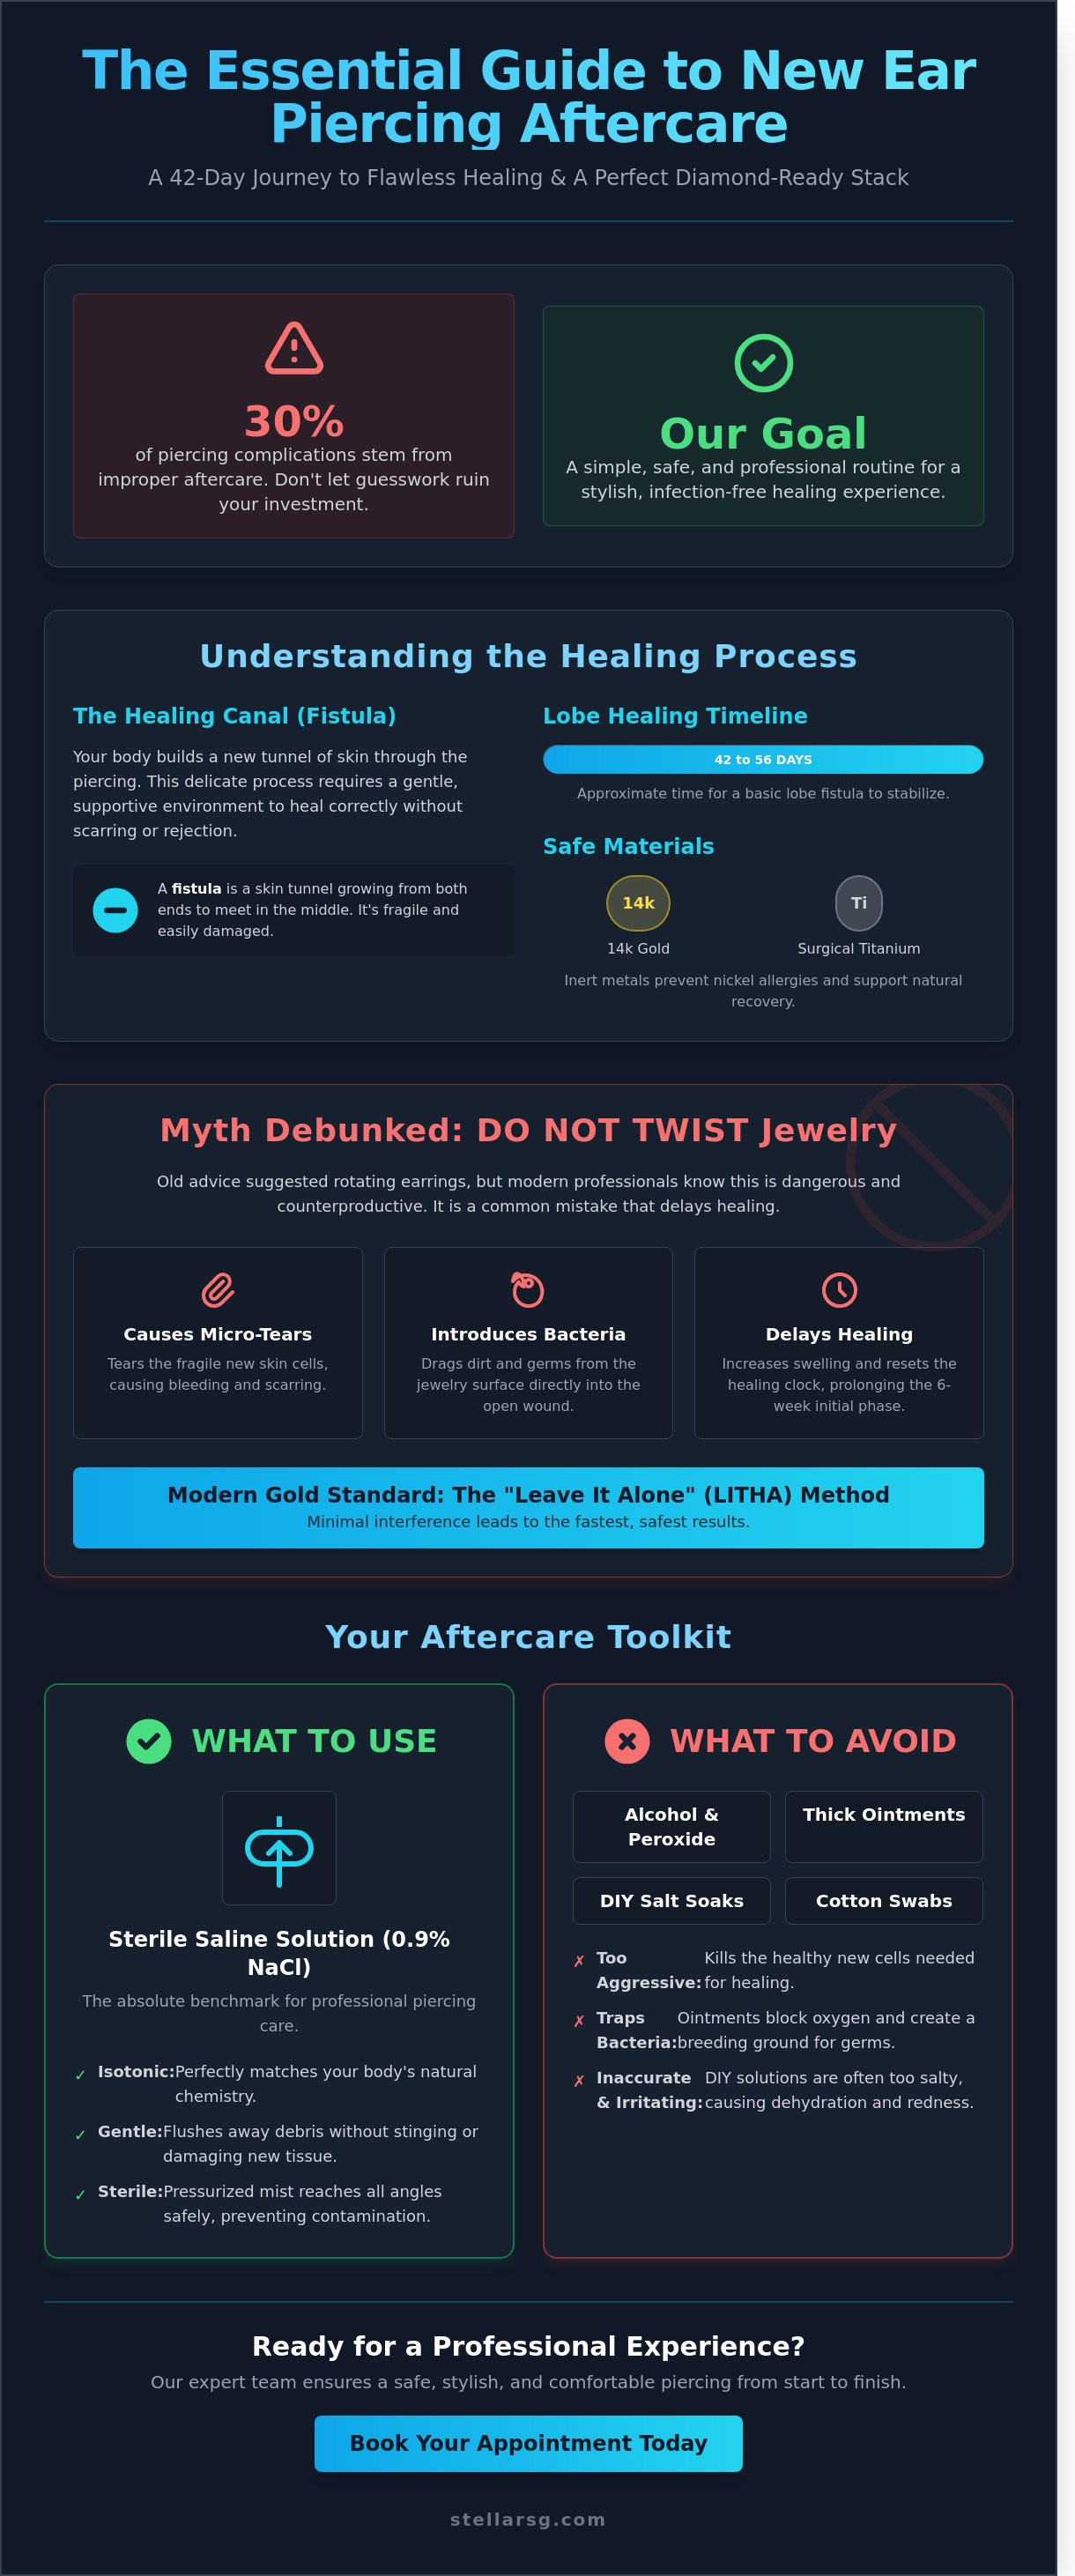
What if the secret to a flawless, diamond-ready earring stack isn't just the jewelry itself, but how you treat your skin during the first 42 days? You've invested in a premium new look, yet the fear of a painful infection or a sensitive skin reaction can feel overwhelming. Since 30% of piercing complications stem from improper maintenance, it's frustrating to find conflicting advice that doesn't fit your busy lifestyle. You want to know exactly how to clean new ear piercing without the guesswork, ensuring your healing journey is as elegant as the studs you're wearing.
We believe your aftercare should be simple, safe, and professional. This guide helps you master the art of piercing maintenance with a clear, step-by-step routine designed for maximum comfort. You'll learn the precise signs of healthy healing and discover exactly when it's safe to switch to your favorite gold or silver pieces. From managing sensitive skin to streamlining your daily habits, we've curated everything you need for a stylish, infection-free experience.
A new piercing is an investment in your personal style. It's more than a simple cleaning chore; it's a proactive healing process that ensures your jewelry looks as elegant as intended. When you understand how to clean new ear piercing sites correctly, you protect the integrity of your skin and the longevity of your aesthetic. Understanding the basics of Body Piercing Aftercare helps you recognize that every piercing is technically a puncture wound. This requires specialized attention to prevent the body from rejecting the jewelry or forming unsightly scar tissue.
Our "Stellar Promise" combines this medical-grade safety with high-end results. By following a professional regimen, you avoid the 25% risk of localized infection often associated with DIY aftercare. Proper maintenance prevents prolonged redness and ensures your transition from initial studs to our premium piercing service collections is seamless. Taking care of your piercing today means you'll enjoy a lifetime of confident, stylish expression without the setbacks of inflammation or scarring.
Your body reacts to a new earring by building a fistula. This is a tunnel of skin that grows from both ends of the piercing to meet in the middle. It takes roughly 42 to 56 days for a basic lobe fistula to stabilize. Disrupting this biological work with harsh chemicals like hydrogen peroxide or alcohol causes chemical burns and resets the healing clock. We recommend using only high-quality materials, such as 14k gold or surgical titanium. These inert metals don't leach nickel into the wound, which supports the body's natural recovery and prevents allergic reactions.
Old advice often suggested rotating earrings to prevent them from "sticking." This is dangerous. Modern piercing professionals know that twisting causes micro-tears in the fragile fistula. These tiny rips bleed and create entry points for bacteria. When you twist the jewelry, you're essentially tearing away the new skin cells your body worked all night to create. This is a common mistake when people first learn how to clean new ear piercing areas at home.
The "Leave It Alone" (LITHA) method is the modern gold standard for healing, emphasizing that minimal interference leads to the fastest and safest results. If you're ready for a professional experience in a caring environment, you can Book Your Ear Piercing Appointment with our expert team today.
Choosing the right products is the most critical decision you'll make for your healing journey. High-quality aftercare transforms a basic procedure into a premium experience. When you understand how to clean new ear piercing sites with professional-grade supplies, you reduce the risk of irritation and ensure your jewelry remains a sparkling focal point. Expert-led care starts with sterile, medical-grade solutions designed specifically for wound management rather than harsh household chemicals.
Sterile saline solution containing 0.9% sodium chloride is the absolute benchmark for piercing care. This specific concentration is isotonic, meaning it perfectly matches the natural chemistry of human cells. It effectively flushes away crust and debris without stinging or damaging the fragile new tissue. While some suggest mixing salt and water at home, this often leads to a solution that is too salty, which dehydrates the skin and causes redness. Store-bought sprays provide a pressurized, sterile mist that reaches every angle of your jewelry safely. For those seeking the highest standard of care, the Stellar SG Piercing Service provides expert guidance on selecting the best products for your specific skin type.
Many traditional home remedies are actually detrimental to the healing process. Isopropyl alcohol and hydrogen peroxide are far too aggressive for a fresh wound. These chemicals kill the very cells your body produces to close the piercing channel, often extending the initial healing phase by 10 to 14 days. It's also vital to stay away from thick antibiotic ointments or heavy creams. These products act as a sealant, trapping moisture and bacteria while blocking necessary oxygen flow. To keep your ears healthy and elegant, don't use these common irritants:
Instead of cotton balls, opt for lint-free medical gauze or specialized swabs. These tools allow you to apply the saline solution precisely without leaving debris behind. Learning how to clean new ear piercing areas correctly involves using these clean applicators to gently pat the area dry after every rinse. This meticulous approach ensures your new look stays sophisticated and comfortable throughout the entire healing period. If you're ready to start your journey with a premium experience, you can book your appointment with our specialist team today.
Maintaining a premium piercing requires a disciplined and gentle routine. To ensure your jewelry remains a symbol of elegance rather than a source of irritation, follow this precise professional method for how to clean new ear piercing sites. Consistency is your best tool for a safe and stylish recovery.
For those who prefer expert assistance, our piercing service specialists provide detailed demonstrations on how to clean new ear piercing locations during every appointment. This ensures you leave our studio feeling confident in your aftercare journey.
It's normal to see a clear or pale yellow fluid during the first 14 to 21 days of healing. This is lymph fluid, a sign that your body's natural repair system is active. You'll often find this fluid dries into small "crusties" around the jewelry. Never use your fingernails to pick at these. If a crust is stubborn, leave it alone during your current cleaning session. Forcing a crust off can tear the delicate new tissue forming inside the piercing channel, leading to minor bleeding or localized swelling.
Moisture is a primary catalyst for bacterial growth. In Singapore, where humidity levels often exceed 80%, keeping the area dry is critical for a safe recovery. Avoid using shared bath towels. These fabrics often harbor thousands of bacteria per square inch and can easily snag on your elegant studs. Instead, use a hairdryer on a cool, low-pressure setting for 30 seconds. This provides a touch-free drying experience that minimizes physical trauma to the ear while ensuring every hidden crevice is moisture-free. If you're ready for your next look, you can book your appointment to consult with our team about your healing progress.
Singapore’s tropical climate presents specific hurdles for anyone healing a fresh piercing. Average daily humidity levels of 84% mean that moisture stays on the skin longer than in drier regions. This creates a perfect breeding ground for unwanted bacteria. Knowing how to clean new ear piercing sites effectively in this heat is the difference between a smooth recovery and a frustrating infection. You've to be proactive about environmental factors that people in cooler climates might ignore.
Sweat is your primary concern in the heat. It’s naturally acidic and contains oils that can irritate a fresh wound. If you spend time outdoors or finish a gym session, rinse your piercing with sterile saline immediately. Don't let sweat sit on the skin for more than 30 minutes. Airflow is your best friend during the first 14 days. Style your hair in a ponytail or bun to keep the area clear and cool. This prevents heat from being trapped against the ear, which can lead to "moisture bumps" or localized swelling.
Swimming requires a strict timeline. Stay away from the ocean or public swimming complexes for at least 42 days. Even with the best maintenance, chlorine and seawater harbor bacteria and chemicals that can disrupt the delicate healing tract. If you're looking for a professional start to your journey, our piercing service utilizes medical-grade standards to ensure your ears are set up for success in any climate.
Pressure is a silent enemy of a straight, healthy piercing. If you're a side-sleeper, you risk "piercing migration," where the angle of the hole shifts because the jewelry is constantly pushed against the pillow. The best solution is the travel pillow hack. Use a U-shaped travel pillow and rest your ear in the central opening. This keeps all weight off the ear while allowing you to sleep on your preferred side comfortably.
Maintaining a sterile sleep environment is just as important as the cleaning itself. Follow these three rules for the first month:
Consistency is the key to an elegant result. By controlling these external factors, you're giving your body the best chance to heal without setbacks. Ready to add a new sparkle to your collection? Book your appointment with our expert team today for a safe and stylish experience.
Healing is a gradual process that requires patience and precision. While you've mastered how to clean new ear piercing sites at home, professional oversight remains essential for a perfect result. Lobe piercings generally take 6 to 8 weeks to reach initial maturity. Cartilage piercings, such as the helix or conch, require a longer commitment of 6 to 12 months. A critical milestone in this journey is the downsize appointment, typically scheduled 4 to 6 weeks after your session.
During this visit, a professional piercer replaces the initial longer post with a shorter one. This is necessary because the initial jewellery is long to accommodate swelling. Once the swelling subsides, a long post can snag on hair or clothing, causing the piercing to migrate or heal at an awkward angle. Ensuring your jewellery fits snugly after the first month is the best way to keep the piercing track straight and elegant.
It's common to feel a bit anxious during the first few days of healing. During the first 7 days, slight swelling, redness, and a clear or pale yellow discharge are normal. These are signs of your body's natural inflammatory response as it adjusts to the new jewellery. You might also notice some crusting, which is why knowing how to clean new ear piercing properly with saline is so vital.
Certain symptoms indicate a genuine infection rather than simple irritation. You should contact a professional if you experience:
If you suspect an infection, don't remove the jewellery. Keeping the earring in place allows the wound to drain. If you take it out, the skin can close over the wound, trapping the bacteria inside and potentially leading to a painful abscess.
Patience pays off with a world of style. You should wait at least 6 to 8 weeks for lobes and up to a full year for cartilage before you consider switching to fashion pieces. Changing your jewellery too early can damage the fragile new tissue and set your healing back by several months. When you're ready to transition, prioritize skin health by choosing hypoallergenic materials that offer both safety and sophistication.
Materials like 14k or 18k gold and implant-grade titanium are ideal for sensitive ears. These premium metals lack the nickel content that often causes allergic reactions or irritation. You can explore a curated selection of high-quality, stylish pieces when you Buy Earrings in Singapore through our boutique. Professional help ensures your first change is seamless and irritation-free. Ready for your next look? Book an appointment for a professional jewellery change with our expert team to ensure your ears stay healthy and beautiful.
Mastering how to clean new ear piercing sites is the most important step in protecting your health and your style. Lobe piercings typically require 6 to 8 weeks of dedicated daily care, while cartilage can take up to 12 months to fully heal. Stick to sterile saline solutions and avoid touching your jewelry with unwashed hands. In Singapore’s humid climate, where relative humidity often exceeds 80 percent, keeping the area dry after exercise is essential to prevent bacterial growth. By following these professional steps, you'll ensure your new look stays vibrant and irritation-free.
Experience the perfect blend of safety and sophistication at Stellar SG. Our expertly trained staff prioritizes your comfort during every procedure. We offer a curated collection of premium hypoallergenic jewellery designed for even the most sensitive skin. With multiple convenient locations across Singapore, your next elegant transformation is just a short trip away. Don't leave your aftercare to chance when you can have expert guidance from the start.
Book Your Safe & Elegant Piercing Appointment at Stellar SG
Your journey to a beautiful, healthy piercing starts with expert care and the right style choices.
You should avoid using tea tree oil on a fresh piercing because its high concentration often causes localized skin irritation or chemical burns. While some suggest it for healed bumps, the Association of Professional Piercers recommends only sterile saline solution for new wounds. Using harsh oils can disrupt the 24 hour cellular regeneration process. Stick to a gentle saline spray to keep your elegant new look safe and clean.
Minor bleeding is normal during the first 48 hours after your procedure. Your skin is healing a new channel, and small amounts of blood or clear fluid are expected. If bleeding continues after 3 days or seems excessive, contact your piercer immediately. Most clients see these symptoms subside within the first 72 hours as the initial healing phase concludes. Ensure you follow the steps on how to clean new ear piercing to prevent disturbing the scab.
You should wait at least 6 weeks before swimming in a pool or open water. Chlorine and bacteria found in public pools increase the risk of infection by 30 percent according to dermatological studies. If you must swim sooner, use a waterproof bandage to seal the area completely. Always rinse the piercing with sterile saline immediately after exiting the water to remove any residual chemicals or pathogens.
Visit your professional piercer immediately to have a longer post installed if your earring feels too tight. Swelling is a natural response, but a tight backing can embed into the skin or restrict blood flow. Professional studios usually stock 2 or 3 different post lengths to accommodate individual swelling patterns. Don't attempt to remove or loosen the jewelry yourself, as this can introduce bacteria into the open wound.
You shouldn't use a cotton bud because the tiny fibers can snag on the jewelry and trap bacteria. These microscopic threads lead to irritation or localized infections in 15 percent of reported aftercare issues. Instead, use a piece of non-woven gauze soaked in saline. This provides a clean, lint-free surface to gently wipe away any crustal buildup from the back of your elegant earring.
Your piercing is fully healed when the skin feels soft, shows no redness, and produces no discharge for at least 30 consecutive days. While the surface looks healed in 6 weeks, the internal tissue takes 6 to 12 months to strengthen completely. You'll notice the jewelry moves freely without any "crusty" sensations or tenderness. Patience ensures your premium jewelry remains a beautiful, permanent addition to your style.
You must never take your earring out to clean the post during the initial 12 week healing period. Ear piercings can close in less than 30 minutes if the jewelry is removed prematurely. This is the most important rule for how to clean new ear piercing safely. Simply spray the area with saline and wipe around the jewelry. Keeping the post stationary prevents trauma to the delicate new skin cells forming inside the piercing.
The best way to clean a child's piercing is using a no-touch sterile saline spray twice daily. Our skilled staff recommends making it a relaxing part of their morning and bedtime routine to reduce anxiety. About 90 percent of children respond better when they can see what's happening in a mirror. Use positive reinforcement and explain that this quick step keeps their stylish new stars bright and healthy.


